Roasted chicken recipe is the most disproportionately impressive thing a beginner cook can learn to make. The result — a whole golden bird pulled from the oven, skin crackling, the kitchen smelling like something worth sitting down for — looks and smells like serious cooking. The actual technique is simpler than most pasta dishes. Salt it, butter it, put it in a hot oven, and check one temperature reading. Everything else is optional.
A whole roasted chicken is also one of the highest-value cooks in any kitchen. It provides dinner for four people, enough leftover meat for two additional weekday meals, and a carcass that produces the best chicken stock you will ever taste. One bird, one afternoon session, and an entire week of protein handled.
In this post you will learn why the dry brine makes such a significant difference and how far in advance to do it, the butter-under-the-skin technique that keeps the breast from drying out, why 425°F produces better skin than lower temperatures, which part of the chicken to probe with the thermometer and at what reading to pull it, how long to rest before carving, and how to use the whole carcass for stock.
15 mins + overnight dry brine
1 hr – 1 hr 15 mins
15 mins
4
Easy
The Dry Brine: The Step Most Beginners Skip
Dry brining a whole chicken — salting it generously all over, inside the cavity, and under the breast skin, then refrigerating it uncovered overnight — is the single technique that most consistently separates impressive roasted chicken from merely acceptable roasted chicken.
The salt draws surface moisture out of the chicken in the first hour, then the moisture reabsorbs into the meat carrying the salt with it over the following hours. This produces three things simultaneously: seasoning that penetrates through the meat rather than sitting only on the skin, a drier skin surface that crisps far more effectively in the oven, and a slightly more tender texture from the salt’s effect on the muscle proteins.
The minimum useful dry brine time is one hour at room temperature. Four hours in the fridge is noticeably better. Overnight — twelve to twenty-four hours — is the target for the best result. Leave the chicken uncovered in the fridge during the brine; airflow around the surface dries the skin further, which amplifies the crispness during roasting.
If you are cooking the chicken same-day with no time to brine, salt it as generously as possible, pat it dry after thirty minutes, and proceed. You will still get good chicken — just not quite the same as the overnight version.
Butter Under the Skin: Keeping the Breast Juicy
The breast is the driest part of a roasted chicken because it is positioned closest to the oven’s radiant heat and contains very little fat of its own. Pushing softened herb butter directly under the breast skin — between the skin and the meat — bastes the breast from the inside as it melts during roasting, providing a continuous source of fat and flavour that keeps the meat tender even when it reaches proper temperature.
Use your fingers to gently separate the skin from the breast meat, working from the cavity end without tearing the skin. Push a generous tablespoon of softened butter mixed with garlic, thyme, lemon zest, and salt under each breast half. Smooth the skin back down over the butter. The butter melts during roasting, producing a self-basting mechanism and a deeply golden, flavoured skin that you cannot achieve by simply rubbing butter on the outside.
Also rub the exterior of the entire bird with olive oil or softened butter. This protects the skin from drying and promotes even browning across every surface.
The Cavity: Aromatics, Not Stuffing
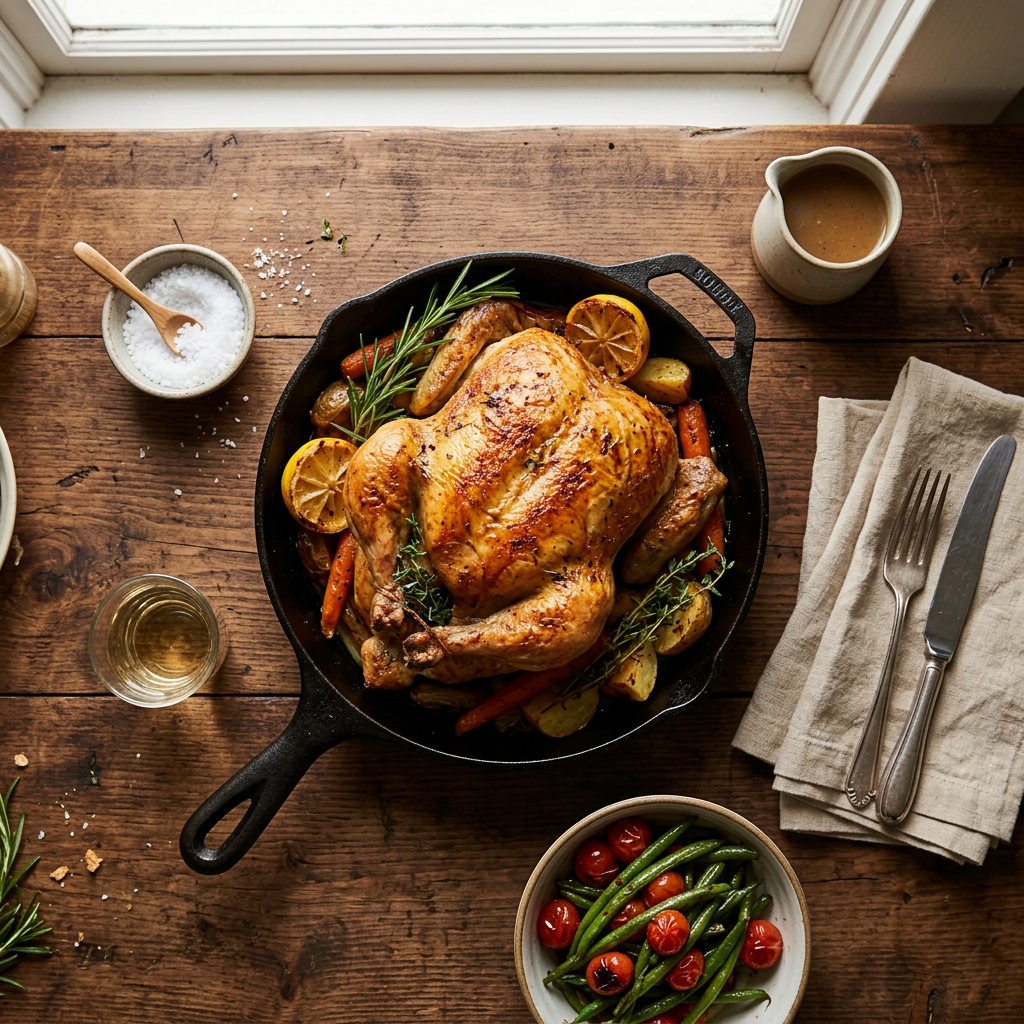
Stuffing a chicken slows cooking dramatically and produces uneven doneness — the stuffing must also reach a safe temperature, which requires the bird to stay in the oven long past when the meat is perfectly cooked. Instead, fill the cavity with aromatics that perfume the bird from the inside: a halved lemon squeezed inside, a head of garlic halved crosswise, a few sprigs of fresh thyme and rosemary. These steam gently inside the cavity, scenting the meat without adding any cooking time complication.
Trussing — tying the legs together with kitchen twine — produces a more even shape that promotes uniform cooking and prevents the leg joints from overcooking before the breast is done. It is not strictly necessary, but for a first roasted chicken it is worth the two minutes it takes and produces a noticeably better-looking result.
425°F: The Right Temperature for Crispy Skin
Roasting a whole chicken at 425°F produces deeply golden, genuinely crispy skin in the same time it takes to fully cook the meat. Lower temperatures — 325 to 375°F — produce softer, more tender meat but pale, slightly flabby skin that never achieves the crackle that makes a roasted chicken genuinely exciting to eat.
The high heat rapidly renders the fat under the skin and crisp-dries the skin surface simultaneously. This is the same principle that makes 425°F the correct temperature for roasted vegetables — rapid surface drying and caramelisation before the interior has time to steam and soften.
Preheat the oven for at least twenty minutes before the bird goes in. The oven walls and rack need to reach full temperature — not just the air — for the roasting environment to be consistent from the moment the chicken enters. A properly preheated 425°F oven produces immediate skin sizzling that a technically-at-temperature oven that has just reached 425°F on the dial does not.
Where to Probe and What Temperature to Pull
Probe the thickest part of the thigh — not the breast, not the drumstick joint, but the deep muscle of the thigh. Insert the thermometer horizontally toward the joint without touching the bone. Bone conducts heat differently from meat and will give a falsely high reading.
Pull the chicken when the thigh reads 165°F. At this temperature the thigh meat is fully safe and still juicy. The breast, which is closer to the oven surface and therefore hotter, will be at 170 to 175°F — safely cooked and still tender, not dried out as it would be if you probed the breast and waited for it to reach 165°F (by which point the thigh would be considerably over 165°F and beginning to dry).
The ThermoPro TwinTempSpike Bluetooth Thermometer is the single most useful tool for roasted chicken — clip the probe into the thigh at the start of roasting and monitor the temperature from your phone without opening the oven repeatedly. You will know exactly when to pull the bird without guessing and without opening the oven to lose heat.
The 15-Minute Rest: As Important as the Cook
Rest the chicken for a minimum of fifteen minutes after coming out of the oven, loosely tented with foil. During this time the internal temperature continues to rise slightly from carry-over heat, and the muscle fibres, which contracted and squeezed moisture toward the centre during the high-heat cook, relax and reabsorb those juices.
A chicken carved immediately after coming out of the oven releases a flood of juice onto the cutting board. That juice is the flavour and moisture that belongs in the meat. A properly rested chicken holds almost all of it inside — each slice is noticeably juicier and more flavourful than an unrested bird.
The fifteen minutes is also the perfect time to make a quick pan sauce from the roasting juices and any fond left in the pan — a tablespoon of flour whisked into the drippings, chicken stock added and reduced, a small knob of butter stirred in at the end.
The Right Roasting Vessel
A heavy, wide pan that the chicken fits in without excess space is the correct vessel. Too much empty space around the bird allows the drippings to spread thinly across the pan bottom, where they can burn rather than accumulate into the concentrated flavoured base for a pan sauce or gravy.
The Taima Titanium Deep Pan Pro is the right size for a standard 1.5 to 2 kg (3.5 to 4.5 lb) chicken — oven-safe at 425°F without any concern about coating degradation, PFAS-free, and non-reactive so the lemony, slightly acidic roasting juices do not interact with the vessel surface over the full roasting time.
Elevate the chicken slightly off the pan surface if possible — on a small wire rack, on a bed of root vegetables, or simply on halved onions placed in the pan bottom. Elevation promotes airflow under the bird, producing more even browning across the back and bottom of the chicken rather than a steamed, paler underside.
What to Do With the Leftovers
A whole roasted chicken provides dinner for four and enough leftover meat for two additional weeknight meals. Shred the remaining meat from the carcass after dinner — thigh and breast both — and refrigerate in an airtight container for up to three days. Use it cold in salads, warm in pasta, or stirred into a soup as a quick protein addition.
The carcass, including the back, neck, and any wings, produces exceptional chicken stock. Place the whole carcass in a pot with a halved onion, two carrots, two celery stalks, a bay leaf, and cold water to cover. Simmer for two to three hours. Strain and refrigerate. This stock is the base for the best homemade chicken noodle soup you will ever make — the homemade chicken noodle soup guide walks through exactly that process, and carcass stock makes it dramatically better than store-bought broth.
For a complete framework on using a Sunday roasted chicken as the protein anchor for an entire week of high-protein meals, the 52-Week High-Protein Meal Prep Cookbook covers exactly this strategy — one Sunday cook that covers multiple lunches and dinners with minimal daily effort.
Whole Roasted Chicken with Crispy Skin
A whole chicken dry-brined overnight for maximum skin crispness and seasoned depth, with herb butter pushed under the breast skin, lemon and garlic in the cavity, and roasted at 425°F until the thigh reads 165°F. Rested fifteen minutes before carving. Feeds four, provides two more weeknight meals, and a carcass that makes outstanding stock.
Ingredients
The Bird
- 1 whole chicken, 1.5–2 kg (3.5–4.5 lbs), giblets removed
- 1.5 tsp kosher salt (for dry brine — or 1 tsp per kg of bird)
- 1/2 tsp black pepper
Herb Butter (for under and on the skin)
- 3 tbsp unsalted butter, softened to room temperature
- 2 cloves garlic, finely grated
- 1 tsp fresh thyme leaves (or 1/4 tsp dried)
- Zest of 1/2 lemon
- 1/4 tsp salt
Cavity Aromatics
- 1 lemon, halved (squeeze juice into cavity then add the halves)
- 1 head of garlic, halved crosswise
- 4 sprigs fresh thyme or rosemary
For the Pan
- 1 tbsp olive oil (to rub the exterior)
- 1 large onion, halved (to elevate the bird in the pan)
- 120ml (1/2 cup) chicken stock or water (in the pan bottom — prevents drippings from burning)
Instructions
- Dry brine: Pat the chicken completely dry inside and out with paper towels. Season generously with salt and pepper all over the exterior, inside the cavity, and under the breast skin. Place uncovered on a plate in the fridge overnight (or at least 1 hour). Remove from the fridge 30–45 minutes before roasting.
- Make the herb butter: stir together softened butter, grated garlic, thyme, lemon zest, and salt until smooth.
- Prepare the chicken: pat dry again if any moisture has appeared. Using your fingers, gently separate the skin from the breast meat from the cavity end without tearing. Push a generous tablespoon of herb butter under the skin over each breast half. Smooth the skin back down. Rub the remaining herb butter and the olive oil all over the exterior of the bird.
- Fill the cavity: squeeze the lemon halves into the cavity and add them along with the halved garlic head and herb sprigs.
- Set up the pan: place onion halves cut side down in the roasting pan. Set the chicken breast-side up on top of the onions. Pour stock or water into the pan bottom. If trussing, tie the legs together with kitchen twine.
- Preheat the oven to 425°F (220°C) for at least 20 minutes. If using the ThermoPro TwinTempSpike, insert the probe into the thickest part of the thigh (not touching bone) before the bird goes in. Set the target temperature to 165°F.
- Roast for 60 to 75 minutes for a 1.5 kg bird, 75 to 90 minutes for a 2 kg bird. Start checking at 55 minutes. The thigh should reach 165°F, the skin should be deep golden brown and crackling-crisp.
- Rest: remove from the oven and transfer to a cutting board. Tent loosely with foil. Rest for 15 minutes before carving. Do not skip this step.
- Carve: remove legs first (cut through the joint), then wings, then breasts (slice along the breastbone). Serve immediately with pan drippings spooned over.
Notes
Where to probe: Always probe the thigh, not the breast. The thigh is the last part to reach safe temperature. Probing the breast gives a falsely high reading — by the time the breast reaches 165°F, the thigh is already overcooked.
Skin not crispy: The skin was likely wet going into the oven. Overnight dry brining and patting completely dry before roasting are the two techniques that guarantee crispy skin. Roasting at 425°F rather than a lower temperature also makes a significant difference.
Cook time: The approximate rule is 15 minutes per pound at 425°F, but always confirm with a thermometer. Oven calibration varies significantly and is the most common cause of inconsistent results.
Leftovers: Shred remaining meat and refrigerate for up to 3 days. Simmer the carcass with vegetables and water for 2–3 hours for outstanding homemade chicken stock — the base for the best chicken noodle soup of your life.
Beginner tip: This recipe sounds involved on paper but is almost entirely hands-off. The dry brine takes five minutes. The herb butter takes two minutes. After that, the oven does everything. The fifteen-minute rest is the most important step and the one most people skip — it makes the difference between a juicy and a dry result regardless of how well the bird was cooked.
Tools & Resources
- 52-Week High-Protein Meal Prep Cookbook — use one Sunday roasted chicken as the protein anchor for an entire week of high-protein meals with minimal daily effort
- ThermoPro TwinTempSpike Bluetooth Thermometer — insert into the thigh before the bird goes in, monitor the temperature from your phone throughout the roast, and pull at exactly 165°F without opening the oven once
- Taima Titanium Deep Pan Pro — oven-safe, PFAS-free roasting vessel that fits a standard whole chicken, collects all the roasting drippings for a pan sauce, and handles 425°F without any coating concern
- Taima Pure Titanium Cutting Board Set — stable, non-porous carving surface that does not absorb juices from the resting bird and keeps the cutting surface flat and secure during carving
A great roasted chicken recipe is built on decisions made before the bird ever touches the oven. Dry-brine overnight — the single step that most transforms the result — for seasoning that penetrates the meat and skin that crisps without steaming. Push herb butter under the breast skin for a self-basting mechanism that keeps the leanest part of the bird juicy throughout the high-heat roast. Probe the thigh rather than the breast, pull at 165°F, and rest for fifteen minutes before carving so the juices redistribute rather than running onto the board. One bird, four servings, two additional weeknight meals from the leftovers, and a carcass that produces the best chicken stock you have ever made. The effort is almost nothing. The return is extraordinary.
The roasting vessel shapes the result — a non-reactive, PFAS-free, oven-safe pan that handles sustained 425°F heat and collects the drippings without burning them into the bottom of the pan makes every step easier. If you are thinking about upgrading your kitchen equipment to something built for exactly this kind of high-heat roasting and everyday cooking, the full breakdown is at Titanium Cookware That Actually Works (2025) — covering what sets pure titanium apart and which pieces to prioritize first.
Leave a Reply