Creamy garlic pasta was the first recipe that made me understand what people mean when they say cooking is a skill you feel rather than follow. I had made it a dozen times from various recipes and it always came out fine but never quite right — the sauce either broke, or it was thick and cloying, or the garlic was raw-tasting. Then I figured out the three small things I was consistently doing wrong, and the recipe clicked.
If you are just getting started in the kitchen and want a recipe that looks and tastes impressive but requires no special skill to execute, this is it. Pantry staples, one pan, twenty minutes, and a result that genuinely tastes like something from a proper Italian restaurant.
In this post you will learn why pasta water is the secret to a silky sauce that never breaks, how to cook garlic so it is golden and sweet rather than harsh and raw, which pasta shapes hold the sauce best, and how to build variations on this same recipe so it never gets boring.
5 mins
15 mins
20 mins
2–3
Easy
Why Creamy Garlic Pasta Works Every Time
The reason this easy garlic pasta recipe works consistently comes down to one technique: using pasta water to build the sauce rather than relying solely on cream. Pasta water is starchy and slightly salty — it emulsifies with the butter and cream, creating a sauce that clings to the pasta rather than pooling at the bottom of the bowl.
When you add cream to a dry pan, it tends to separate or become one-dimensional. When you introduce a splash of starchy pasta water first, the emulsification happens gradually and the sauce stays glossy and cohesive all the way to the table.
This is the technique used in Italian restaurant kitchens to achieve that silky, restaurant-quality finish that is hard to replicate at home without understanding why it works.
How to Cook Garlic Properly
Garlic is the foundation of this creamy pasta sauce, and it is also the element most beginners get wrong. Raw garlic is sharp and acrid. Burnt garlic is bitter and ruins the whole dish. The window you are aiming for is golden — about two minutes over medium heat in butter, until the garlic is fragrant, slightly translucent, and just beginning to turn gold at the edges.
Slice the garlic thinly rather than mincing it. Thin slices colour evenly without burning at the edges, give you larger pieces that are pleasant to eat in the finished dish, and release their flavour more gradually than minced garlic.
Start with cold butter in a cold pan, then bring them up to heat together. This gives you much more control than adding garlic to a pan that is already screaming hot. The garlic goes in before the pan reaches full temperature, which means you have more time to watch it and pull it back if it starts moving too fast.
The Pasta Water Trick
Before you drain your pasta, scoop out at least a full cup of the cooking water and set it aside. This is the most commonly skipped step in any pasta recipe, and it is the one that makes the biggest difference.
The starch that leaches from the pasta as it cooks thickens the water just enough to help the sauce emulsify. When you add this starchy water to the pan alongside your cream and butter and Parmesan, everything comes together into a single cohesive sauce rather than a split or greasy one.
Add the pasta water a little at a time — a few tablespoons to start, then more as needed. The goal is a sauce that is thick enough to coat every strand but loose enough to flow slightly when you lift it with tongs.
Choosing the Right Pasta Shape
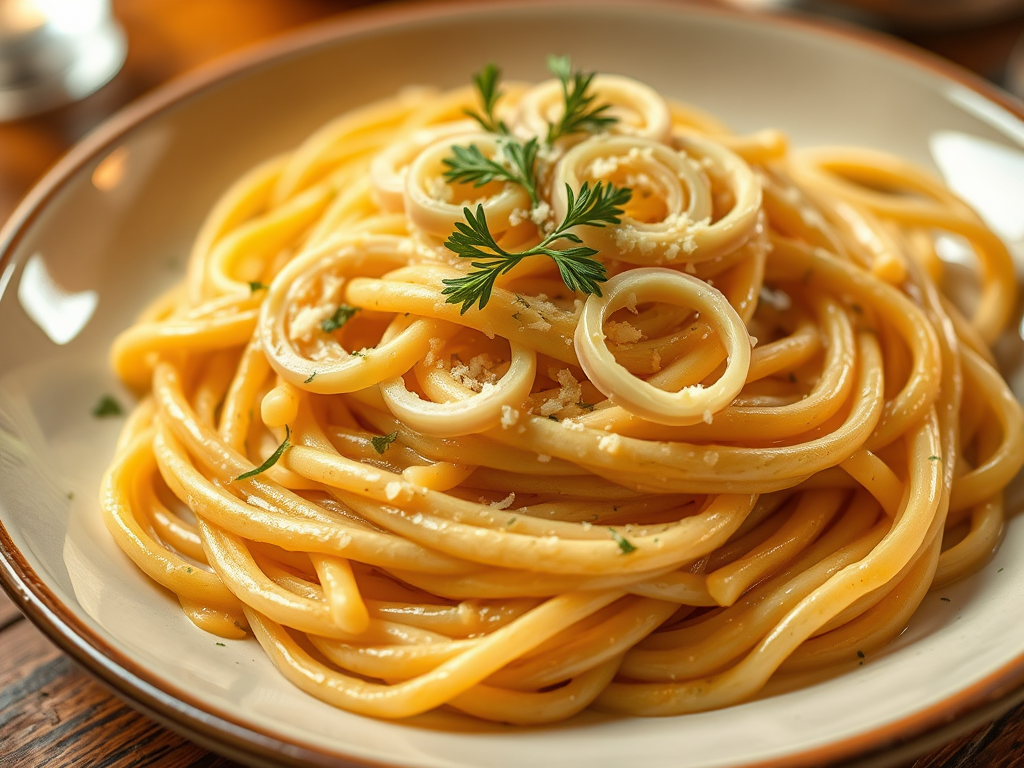
Long pasta shapes hold a creamy garlic sauce beautifully because the sauce wraps around each strand rather than sitting on top. Spaghetti is the classic choice. Linguine is slightly wider and gives you more surface area per bite. Tagliatelle is even wider and creates a luxurious mouthfeel.
Short pasta shapes also work — rigatoni in particular is excellent because the ridges and hollow centre trap sauce inside each piece. Avoid very smooth, slick shapes like penne lisce (smooth penne) for this recipe, as the sauce slides right off.
Cook the pasta until al dente — firm to the bite, with a small white dot visible in the cross-section if you cut a piece in half. It will continue cooking for another 30–60 seconds in the hot sauce pan, and overcooked pasta turns mushy before it ever reaches the bowl.
The Sauce: Butter, Cream, Parmesan
The creamy pasta sauce for this recipe has three components: unsalted butter for richness and as the base for the garlic infusion, double cream or heavy cream for body and creaminess, and freshly grated Parmesan for salt, depth, and the binding property that makes the sauce stick to the pasta.
Use freshly grated Parmesan rather than pre-grated. Pre-grated Parmesan contains cellulose (an anti-caking agent) that prevents it from melting smoothly into a sauce. Fresh-grated Parmesan melts almost instantly and produces a completely different result.
Season at the end, not the beginning. The pasta water, the butter, and the Parmesan all contribute salt — add the final seasoning only after the sauce is assembled and tasted, or you risk oversalting significantly.
The Pan Matters More Than Most People Realise
A wide, heavy pan is the right choice for this recipe. You need enough surface area to toss the pasta in the sauce without it piling up, and you need even heat distribution so the cream reduces gently rather than scorching in hot spots.
The Taima Titanium Nutri Pan Pro 2.0 is an excellent choice for a cream-based pasta sauce — pure titanium heats evenly, has no PFAS coating to worry about when building an acidic sauce, and is non-reactive, which matters when you are working with cream and Parmesan directly in the pan.
The wide surface also means you can finish the pasta in the sauce and toss it without losing pieces over the edge — which is a real problem with smaller pans when you are trying to coat everything evenly.
Variations to Keep It Fresh
Garlic shrimp pasta: add peeled shrimp to the pan after the garlic is golden, cook for two minutes per side, then proceed with the cream and pasta as usual. The shrimp absorb the garlic butter beautifully and make this a complete one-pan dinner. The method is exactly what was explored in the healthy spring meal prep guide for quick proteins that work well over a starchy base.
Lemon garlic pasta: add the zest of one lemon and a squeeze of juice just before tossing the pasta into the sauce. The acidity cuts through the richness and makes the whole dish feel lighter and brighter — an excellent spring and summer variation.
Roasted cherry tomato: blister a handful of cherry tomatoes in the pan before adding the garlic, letting them burst and caramelise slightly. The tomato juices integrate into the cream sauce and add a sweet-acidic counterpoint that makes the dish more complex with almost no extra effort.
Adding Protein
This pasta is excellent on its own, but it also serves as a reliable base for almost any protein. Sliced grilled chicken, sauteed shrimp, Italian sausage, or crispy pancetta all work within the same framework — cook the protein first in the same pan, remove, build the sauce, then return the protein to finish together.
Crispy pancetta deserves a special mention. Render diced pancetta in the pan until golden and slightly crisp, remove with a slotted spoon, and cook the garlic in the rendered fat rather than fresh butter. The depth of flavour this adds to the finished sauce is remarkable.
For a broader picture of how to build high-protein weeknight dinners from a similar framework, the Complete Beginner’s Guide to Mastering Breads, Cakes, Cookies and Pastries covers the foundational techniques — including how to build sauces properly — that underpin recipes like this one.
Storage and Reheating
Creamy pasta is best eaten immediately. The sauce thickens considerably as it cools and the pasta continues to absorb it overnight, which makes leftovers drier and denser than the original dish.
Reheat in a pan over medium-low heat with a splash of cream or water to loosen the sauce. Do not microwave if you can avoid it — microwave heat is uneven and tends to separate cream sauces. Two minutes in a pan with a tablespoon of liquid restores the texture much more reliably.
If you are planning to make this for meal prep, cook the pasta slightly underdone and store the sauce and pasta separately. Combine and heat together when ready to eat — the pasta finishes cooking in the sauce and the texture holds much better than pasta that was fully cooked and then refrigerated already sauced.
Beginner Tips
Do not add the cream over high heat. Medium or medium-low keeps the cream from breaking and gives you time to stir and adjust without scrambling.
Taste the pasta water before you add any salt to the sauce. If it is well-seasoned, the pasta water alone may provide enough salt for the finished dish. Parmesan also adds significant salt — always season at the end.
Move fast once the pasta goes into the sauce. The sauce reduces quickly and the pasta absorbs liquid fast — have everything ready before you drain the pasta and work efficiently from that point. The whole pan stage takes about 90 seconds from pasta in to serving bowl.
Creamy Garlic Pasta
Silky, golden-garlic pasta tossed in a cream and Parmesan sauce built with starchy pasta water. Ready in 20 minutes with pantry staples — the weeknight dinner you will make on repeat.
Ingredients
- 200g (7 oz) spaghetti, linguine, or tagliatelle
- 4 cloves garlic, thinly sliced
- 2 tbsp unsalted butter
- 120ml (1/2 cup) double cream or heavy cream
- 60g (about 2/3 cup) Parmesan, freshly grated, plus more for serving
- 1/2 cup reserved pasta water (plus more if needed)
- Salt and white or black pepper to taste
- Pinch of chili flakes (optional)
- Fresh parsley, chopped, for garnish
- 1 tbsp olive oil
Instructions
- Bring a large pot of well-salted water to a boil. Cook pasta according to package instructions until al dente. Before draining, scoop out at least 1 cup of pasta water and set aside. Drain the pasta.
- While the pasta cooks, place butter and olive oil in a wide, cold pan. Bring to medium heat together. Once the butter melts and begins to foam, add the sliced garlic and chili flakes (if using).
- Cook the garlic, stirring frequently, for 2–3 minutes until golden and fragrant. Do not let it brown past a light gold — if it starts to darken quickly, remove the pan from heat briefly.
- Pour in the cream. Stir to combine with the garlic butter and bring to a gentle simmer over medium-low heat. Cook for 2 minutes until slightly thickened.
- Add 3–4 tablespoons of the reserved pasta water to the sauce and stir. This starchy water will help emulsify the sauce.
- Add the drained pasta directly to the pan. Toss with tongs to coat every strand. Add more pasta water a tablespoon at a time if the sauce is too thick — you want it to cling but not clump.
- Remove from heat. Add the freshly grated Parmesan and toss until melted and fully incorporated. Taste and season with salt and pepper.
- Serve immediately in warm bowls. Top with extra Parmesan, fresh parsley, and a small drizzle of olive oil.
Notes
Storage: Best eaten immediately. If storing, keep sauce and pasta separate in the fridge for up to 2 days. Reheat together in a pan over medium-low with a splash of cream or water.
Parmesan tip: Always use freshly grated — pre-grated Parmesan contains anti-caking agents that prevent it from melting smoothly into sauce.
Sauce too thick: Add pasta water a tablespoon at a time until it flows. Sauce too thin: simmer for another 30–60 seconds off the pasta.
Protein add-in: Cook shrimp, sliced chicken, or pancetta in the same pan first. Remove before building the sauce, then return to finish together.
Beginner tip: Move fast once the pasta goes in. The sauce reduces quickly. Have everything ready before draining the pasta and work in one continuous motion from that point.
Tools & Resources
- Taima Titanium Nutri Pan Pro 2.0 — PFAS-free, non-reactive pan with even heat distribution for building cream sauces without scorching
- Taima Titanium Nutri Pot Pro — ideal for boiling pasta in a PFAS-free, non-reactive vessel that does not affect the flavour of your pasta water
- Taima Pure Titanium Cutting Board Set — non-porous, odor-resistant prep surface for slicing garlic and any protein add-ins
- Garlic Press — for mincing garlic quickly if you prefer a finer texture rather than sliced cloves in the finished sauce
Creamy garlic pasta is the kind of recipe that teaches you several foundational techniques at once — how to cook garlic without burning it, how pasta water emulsifies a sauce, how to finish pasta in the pan rather than serving it in a pool of sauce on top. These are skills that transfer to almost every pasta dish you will ever make, and once you have them, every variation of this recipe becomes easy. The 20-minute window is genuinely achievable, and the result tastes like far more effort went into it than actually did.
The pan you build this sauce in matters — cream and Parmesan behave differently in a reactive pan versus a non-reactive one, and consistent heat makes every step easier. If you are thinking about upgrading your cookware to something non-toxic and built for this kind of everyday high-heat cooking, the full breakdown is at Titanium Cookware That Actually Works (2025) — covering what to look for, what to avoid, and which pieces are worth investing in first.
Leave a Reply