Banana pudding recipe from scratch is one of those desserts where the difference between the box version and the homemade version is larger than almost anywhere else in cooking. Instant pudding mix produces something fine — sweet, creamy, banana-adjacent — but it has none of the richness, depth, or genuine flavour of a pudding made from real egg yolks, whole milk, and vanilla. The from-scratch version takes about thirty minutes of active time and produces something that people request specifically, remember years later, and take to potlucks knowing it will disappear before everything else.
If you have already made the scrambled eggs or the carbonara on this blog and understand egg tempering — adding hot liquid slowly to eggs to warm them gradually rather than scrambling them — you have the primary skill this recipe requires. The custard-making technique here is identical in principle, applied to dessert rather than savoury cooking.
In this post you will learn how to build the vanilla custard without scrambling the eggs, why ripe bananas are essential rather than merely preferable, how to prevent the bananas from browning after assembly, the layering technique that produces a cohesive, beautiful cross-section when served, and why the pudding genuinely improves after four hours in the fridge.
15 mins
20 mins
4 hrs minimum
8–10
Easy–Medium
The Vanilla Custard: The Core of This Banana Pudding Recipe
The pudding base is a classic pastry cream — egg yolks, sugar, cornstarch, and whole milk cooked together until thick, smooth, and glossy. It sets to a spoonable, slightly firm consistency when chilled and melts into the bananas and wafers during the resting period, producing layers that have absorbed each other’s flavours rather than sitting as discrete, separate components.
The two ingredients that elevate this above box pudding: egg yolks and real vanilla. Egg yolks contribute fat, richness, and a warm, slightly savoury depth that instant pudding — which uses vegetable oil and artificial flavouring — cannot produce. Real vanilla extract (or a split vanilla bean scraped into the milk during heating) contributes a floral, complex flavour rather than the flat sweetness of imitation vanilla.
Cornstarch is the thickening agent — easier to work with than flour (which can taste slightly raw if under-cooked) and produces a cleaner, glossier consistency. Six tablespoons for four cups of milk produces a pudding that sets firmly enough to hold its shape in layers while still being creamy and spoonable rather than solid.
Tempering the Eggs: Preventing the Most Common Mistake
Egg yolks added directly to hot milk will scramble — the heat sets the proteins instantly before they can blend into the liquid. Tempering prevents this by gradually raising the temperature of the egg yolks before they enter the hot mixture.
Whisk the egg yolks with the sugar in a bowl until pale and slightly thickened. Slowly pour a thin, steady stream of hot (not boiling) milk into the egg mixture while whisking constantly — add about a third of the hot milk this way before pouring the egg mixture back into the pot with the remaining milk. This gradual temperature increase brings the eggs up to near-hot rather than cold, so when they enter the pot they are already warm and cannot scramble.
The same tempering principle used in carbonara — gradually warming the egg yolks with pasta water before they touch the hot pasta — applies here. Temperature management is the single unifying technique across custards, carbonara, hollandaise, and every other egg-thickened preparation in cooking.
The ThermoPro Candy Thermometer is the most useful tool for beginner custard-making — clip it to the saucepan and monitor the mixture as it thickens. The custard is done when it reaches 165–170°F (74–77°C) and coats the back of a spoon thickly enough that a line drawn through it with a finger holds its shape. This temperature range fully cooks the egg proteins without curdling them.
Cooking the Custard: Patience and Constant Stirring
Once the tempered egg mixture is back in the saucepan with the remaining milk, cook over medium heat while stirring constantly — reaching the corners of the pan with a rubber spatula rather than a whisk, which leaves spots for the eggs to scramble against the hot pan surface.
The mixture will look thin for the first five to eight minutes, then suddenly and noticeably thicken as the cornstarch reaches its gelation temperature. This is the stage to watch for — once it begins to thicken, it moves quickly. Reduce the heat slightly, keep stirring, and cook for an additional two minutes after the first thickening to ensure the cornstarch is fully cooked out and the custard will hold its consistency when cold.
Remove from heat and stir in the cold butter and vanilla extract. The butter enriches the finished custard and gives it a slight gloss. Strain through a fine mesh sieve if there are any lumps — the sieve catches any accidental scrambled egg bits and produces a perfectly smooth custard every time.
Press plastic wrap directly against the surface of the warm custard before refrigerating. This prevents a skin from forming on the surface as it cools. The Taima Titanium Nutri Pan Pro 2.0 is the right size for this custard volume — wide enough for even heat distribution during cooking, with a surface that does not react with the slightly acidic milk and egg mixture.
The Bananas: Ripe Is Essential
The bananas in banana pudding should be ripe — yellow with brown speckles, soft enough to give when pressed, and sweet with a concentrated banana flavour. Underripe bananas are starchy, slightly bitter, and contribute almost none of the banana flavour that makes the dessert worth eating. The same bananas that make excellent banana bread — the ones most people think are past their prime — are exactly right for banana pudding.
Toss the sliced bananas with a teaspoon of fresh lemon juice before layering. The acid prevents enzymatic browning — the same reaction that turns avocado brown — and keeps the banana slices bright and appealing for the full chill time and through serving. A teaspoon of lemon juice for five bananas is enough; any more and the lemon flavour becomes perceptible.
The same ripe banana logic applies to the moist banana bread recipe — both desserts require genuinely ripe bananas and both produce dramatically better results when the bananas are spotted and soft rather than yellow and firm. When you have ripe bananas, you now have two excellent destinations for them.
The Nilla Wafers: Structure and Flavour
Nilla wafers are the traditional choice and the correct one — their vanilla flavour and slightly crisp texture provide the structural layer that absorbs the pudding over the chill time and becomes something between a biscuit and a soaked cake layer. After four hours in the fridge, they are completely soft, having absorbed the pudding and banana juices, and taste of nothing but vanilla and cream.
Chessmen Cookies are a well-regarded alternative that many Southern cooks prefer — slightly richer, butterier, and they hold their structure a little longer than Nilla wafers before fully softening. Both work; the choice is personal.
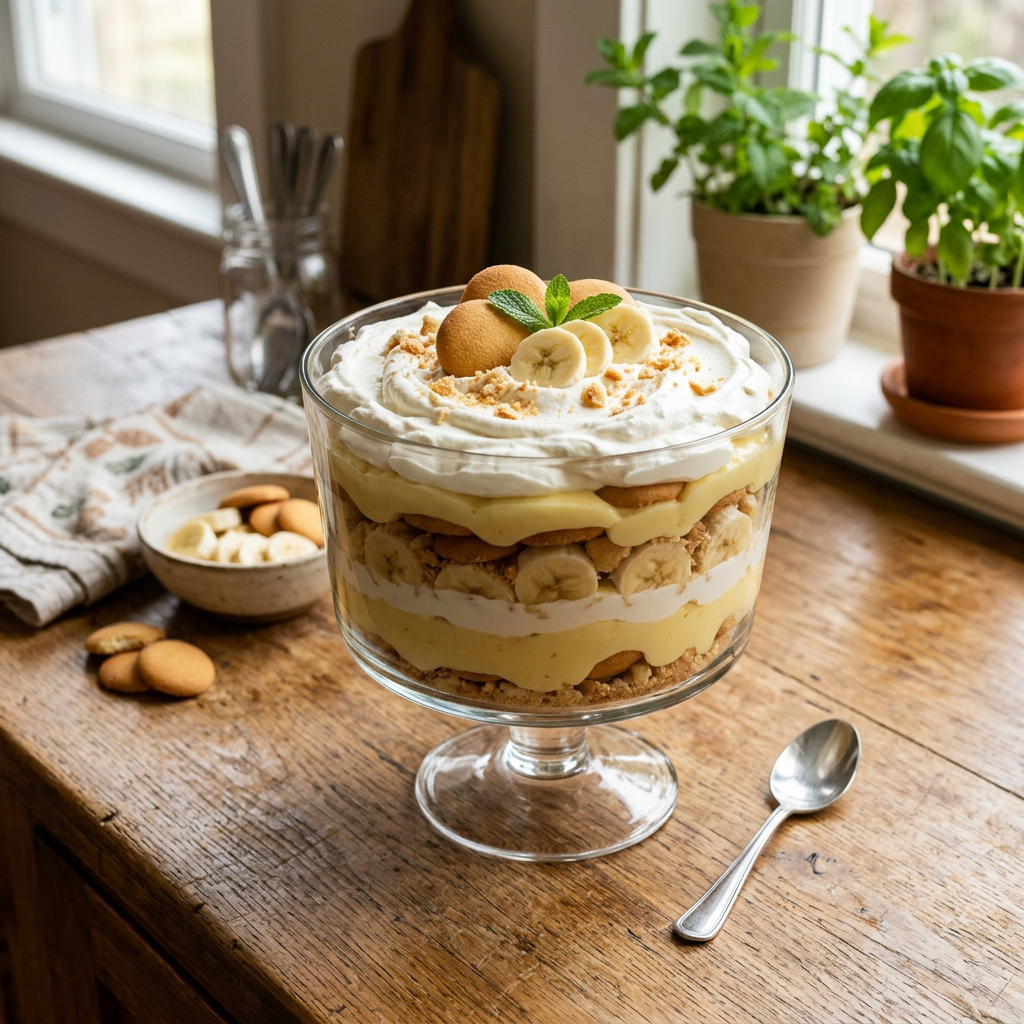
Layer the wafers with the flat side down for the first layer at the bottom of the dish. This produces the most stable base and the most even absorption. Crush a handful of wafers to sprinkle over the very top — the crushed pieces add texture contrast against the smooth pudding and creamy whipped topping.
The Assembly and the Chill: Why This Improves Overnight
Freshly assembled banana pudding is good but not great — the wafers are still crisp, the custard is still warm and slightly stiff, and the flavours have not had time to meld. After four hours in the refrigerator, everything has absorbed into everything else: the wafers are soft and flavourful, the bananas have perfumed the surrounding custard, and the whole dessert has become a cohesive, creamy, layered experience rather than distinct components.
Overnight is better than four hours. Assembled the day before serving, banana pudding reaches its peak — the flavours at their most integrated and the texture at its most silky and unified. This makes it the ideal make-ahead dessert for gatherings, potlucks, and dinner parties.
Top with freshly whipped cream immediately before serving — not hours in advance, as whipped cream weeps and deflates when it sits. Two cups of heavy cream whipped with a tablespoon of sugar and a teaspoon of vanilla to medium-stiff peaks provides the classic creamy finish. The Complete Beginner’s Guide to Mastering Breads, Cakes, Cookies and Pastries covers whipping cream, custard-making, and the full range of pastry techniques that this dessert introduces — excellent for anyone who wants to go further after making this pudding.
Southern Banana Pudding from Scratch
A real vanilla egg yolk custard — cooked on the stovetop with tempering technique — layered with ripe lemon-tossed banana slices and Nilla wafers, topped with freshly whipped cream. Better than any box version. Better the next day than the day it is made.
Ingredients
The Vanilla Custard
- 200g (1 cup) granulated sugar
- 60g (6 tbsp) cornstarch
- Pinch of salt
- 950ml (4 cups) whole milk
- 5 large egg yolks
- 2 tbsp unsalted butter
- 2 tsp pure vanilla extract
The Layers
- 5 ripe bananas (spotted and soft), sliced into coins
- 1 tsp fresh lemon juice (toss with bananas to prevent browning)
- 1 box (11 oz / 312g) Nilla wafers or Chessmen Cookies
The Topping
- 480ml (2 cups) heavy whipping cream
- 2 tbsp granulated or powdered sugar
- 1 tsp vanilla extract
- Crushed Nilla wafers to garnish
Instructions
- Make the custard: whisk egg yolks and half the sugar together in a bowl until pale and slightly thickened. In a saucepan, whisk together the remaining sugar, cornstarch, salt, and milk. Heat over medium, stirring, until steaming — do not boil.
- Temper the eggs: slowly pour about a third of the hot milk into the egg mixture in a thin stream while whisking constantly. Pour the tempered egg mixture back into the saucepan with the remaining hot milk.
- Cook over medium heat, stirring constantly with a rubber spatula (reaching the corners of the pan), until the mixture thickens noticeably — about 8–12 minutes. Once thick, cook for 2 more minutes. Remove from heat. Stir in butter and vanilla. Strain through a fine mesh sieve if desired. Press plastic wrap against the surface to prevent a skin forming. Refrigerate until cool, at least 1 hour.
- Prepare the bananas: toss sliced bananas with lemon juice. Set aside.
- Assemble: in a large trifle bowl or 9×13 inch baking dish, layer Nilla wafers across the bottom (flat side down). Add a layer of banana slices. Spoon one-third of the cooled custard over the bananas, spreading to the edges. Repeat layers twice more: wafers, bananas, custard. End with a custard layer on top.
- Cover tightly and refrigerate for a minimum of 4 hours, overnight preferred.
- Just before serving: whip heavy cream with sugar and vanilla to medium-stiff peaks. Spread or pipe over the top of the pudding. Garnish with crushed Nilla wafers and a few banana slices if desired. Serve immediately after topping.
Notes
Custard too thick after chilling: Whisk in a tablespoon of cold milk before layering. The custard should be thick but spreadable — if it sets too firmly, add milk gradually until it loosens.
Lumpy custard: Strain through a fine mesh sieve. Most lumps are from accidental scrambling around the pan edges — the sieve removes them and produces a perfectly smooth result.
Banana browning: The lemon juice prevents browning for the chill period. If assembling more than 24 hours ahead, expect some light browning — this is cosmetic only and does not affect flavour.
Storage: Covered in the fridge for up to 3 days. Add whipped cream topping only when serving.
Easy shortcut version: Two boxes of instant vanilla pudding mix made with whole milk instead of water, folded with one cup of sour cream and one tub of Cool Whip, then layered with bananas and wafers. Refrigerate 4 hours. Genuinely excellent for a no-cook version.
Beginner tip: The custard thickening can feel alarmingly slow — nothing seems to be happening for eight minutes and then it suddenly thickens. This is normal. Keep stirring, keep the heat at medium, and do not increase the heat to rush it. High heat at this stage scrambles the eggs before the cornstarch can do its job.
Tools & Resources
- Complete Beginner’s Guide to Mastering Breads, Cakes, Cookies and Pastries — the custard-making and whipped cream techniques in this recipe are foundational pastry skills covered in depth in this guide
- ThermoPro Candy Thermometer — clip to the saucepan to monitor custard temperature and pull at 165–170°F when the custard is perfectly thickened and fully cooked without any risk of scrambling
- Taima Titanium Nutri Pan Pro 2.0 — even-heating, PFAS-free pan for the stovetop custard cook — even heat is critical here to prevent hot spots that scramble the egg around the edges before the centre thickens
- Taima Pure Titanium Cutting Board Set — non-porous, stable surface for slicing bananas cleanly and crushing Nilla wafers for the garnish without mess
Banana pudding recipe from scratch is built on one technique applied correctly and one decision made before the dessert ever goes in the fridge. The technique is tempering — gradually warming the egg yolks with hot milk before they enter the saucepan so they thicken the custard rather than scrambling in it. The decision is time — four hours minimum, overnight ideally — because the transformation that happens between freshly assembled and fully rested banana pudding is the difference between a dessert with distinct layers and one where the wafers, bananas, and custard have absorbed each other into something that tastes of everything simultaneously and has no precedent from a box.
Even heat throughout the custard cook makes this technically easier — a pan with hot spots scrambles the eggs at the edges before the centre has had time to thicken. If you are thinking about upgrading to PFAS-free, non-toxic cookware built for exactly this kind of gentle, sustained stovetop cooking, the full breakdown is at Titanium Cookware That Actually Works (2025) — covering what sets pure titanium apart and which pieces to prioritize first.
Leave a Reply