Brownie recipe from a box is reliable in the way that most convenient things are reliable — consistently mediocre. The texture is engineered for the widest acceptable range rather than for the best possible result, and the flavour is flat because the cocoa used is cheap and there is no real chocolate involved. A homemade brownie made with both melted dark chocolate and cocoa powder, plenty of butter, and barely enough flour to hold it together is a categorically different experience. It has a dense, slightly sticky, deeply fudgy interior and a paper-thin crinkly top that catches when you lift a piece. It is one of the most satisfying things to bake precisely because it is simple — one bowl, forty-five minutes, and something genuinely worth making.
If you are building your baking skills, brownies are the ideal second or third baking project after cookies. They teach you the two critical lessons of baking chocolate desserts: chocolate quality determines chocolate flavour, and overbaking by even two minutes is the difference between fudgy and dry. Learn to pull brownies at the right moment and you will apply the same judgement to every chocolate cake, lava cake, and cookie you ever make.
In this post you will learn why using both melted chocolate and cocoa powder produces better flavour than either alone, what makes brownies fudgy versus cakey and how to control which result you get, the toothpick smear test that tells you exactly when to pull them from the oven, why resting them matters, and the variations that turn a classic brownie into something more special.
15 mins
28–32 mins
~45 mins + cooling
16 squares
Easy
The Dual Chocolate Method: Why This Brownie Recipe Tastes Different
Most beginner brownie recipes use only cocoa powder. Some use only melted chocolate. The best fudgy brownies use both — and the reason is that each contributes something the other cannot.
Melted dark chocolate provides fat, richness, and a complex, slightly bitter depth of flavour that comes from the full chemical complexity of roasted cocoa beans processed into chocolate. Cocoa powder provides intense, concentrated chocolate flavour with less fat — it is the ingredient that makes brownies taste distinctly chocolatey rather than merely rich. Together, they produce a flavour that is deeper, more complex, and more satisfying than either alone.
Use good quality dark chocolate — 60 to 70% cacao — not chocolate chips, which contain stabilisers that affect how they melt. A bar of decent dark chocolate from any supermarket is sufficient. The quality of the chocolate is the single biggest variable in the flavour of the finished brownie. Cheap chocolate produces cheap-tasting brownies regardless of how well everything else is executed.
Fudgy vs. Cakey: What Controls the Texture
The fat-to-flour ratio is what determines whether brownies are fudgy or cakey. More fat (butter and chocolate) relative to flour produces a dense, moist, almost sticky interior. More flour relative to fat produces a lighter, more open crumb — closer to chocolate cake than to a proper brownie.
This recipe is calibrated for maximum fudginess. The flour content is kept deliberately low — just enough to provide structure so the brownies hold their shape when cut, not enough to make them light or airy. If you prefer a cakier brownie, add an additional 30g (1/4 cup) of flour.
The egg count also affects texture. This recipe uses whole eggs plus one additional egg yolk. The extra yolk adds fat and richness without the additional white, which contributes to a lighter, more aerated texture. Two whole eggs with no extra yolk produces a slightly cakier result. Three whole eggs makes the brownies even cakier. One egg with extra yolks pushes them even fudgier but makes the batter very dense.
The Butter and Chocolate Melt: The Most Important Step
Melt the butter and chopped chocolate together over the lowest possible heat, stirring constantly. Chocolate scorches easily — even ten seconds of unattended heat on a too-hot surface can burn it, producing a grainy, bitter mixture that cannot be rescued. Low heat, constant stirring, and patience produce a smooth, glossy mixture that smells intensely of chocolate and forms the base of every flavour in the finished brownie.
Remove from heat and allow the mixture to cool for three to five minutes before adding the eggs. Eggs added to hot chocolate-butter mixture will partially scramble — the heat sets the egg protein before it can combine properly with the fat, producing a greasy, lumpy batter. Warm is fine; hot is not. Touch the bottom of the bowl — it should be warm but comfortable to hold.
A small saucepan or the Taima Titanium Nutri Pan Pro 2.0 over very low heat is the right vessel for this step — PFAS-free and even-heating so the chocolate base stays in the gentle temperature range that melts without scorching. The wide surface also makes it easy to stir constantly and see the mixture clearly as it combines.
Whisking the Eggs and Sugar: Building the Crinkly Top
The characteristic shiny, crinkled surface of a great brownie comes from whisking the eggs and sugar together vigorously for two to three minutes before adding the chocolate mixture. This step partially dissolves the sugar into the egg and creates a very thin, sugar-rich layer at the surface of the batter that sets before the interior is done during baking — producing the distinctive skin everyone recognises.
Whisk with a balloon whisk until the mixture is pale, slightly increased in volume, and trails from the whisk in a thick ribbon. This takes two to three minutes by hand or sixty seconds with an electric mixer. Under-whisked eggs and sugar produce a flat, matte surface with no crinkle. Over-whisking is essentially impossible — more air in the egg-sugar mixture produces a slightly cakier texture if anything, but the crinkly top remains.
Add the cooled chocolate-butter mixture to the egg-sugar mixture, not the other way around. Pouring hot chocolate into eggs is how you get scrambled egg brownies.
The Flour: Fold, Don’t Stir
Add flour, cocoa powder, and salt to the batter and fold with a rubber spatula using slow, deliberate strokes from the bottom of the bowl up and over the top. Mix until just combined — stop when you can no longer see dry flour. Over-mixing brownie batter develops gluten and produces a tough, bouncy texture. The number of strokes from dry ingredients to combined batter should be fifteen to twenty. That is genuinely all it takes.
Fold in any chocolate chips or chunks last, using two or three additional strokes. These stay as distinct pieces in the finished brownie and produce pockets of melted chocolate that add textural contrast to the dense fudgy interior.
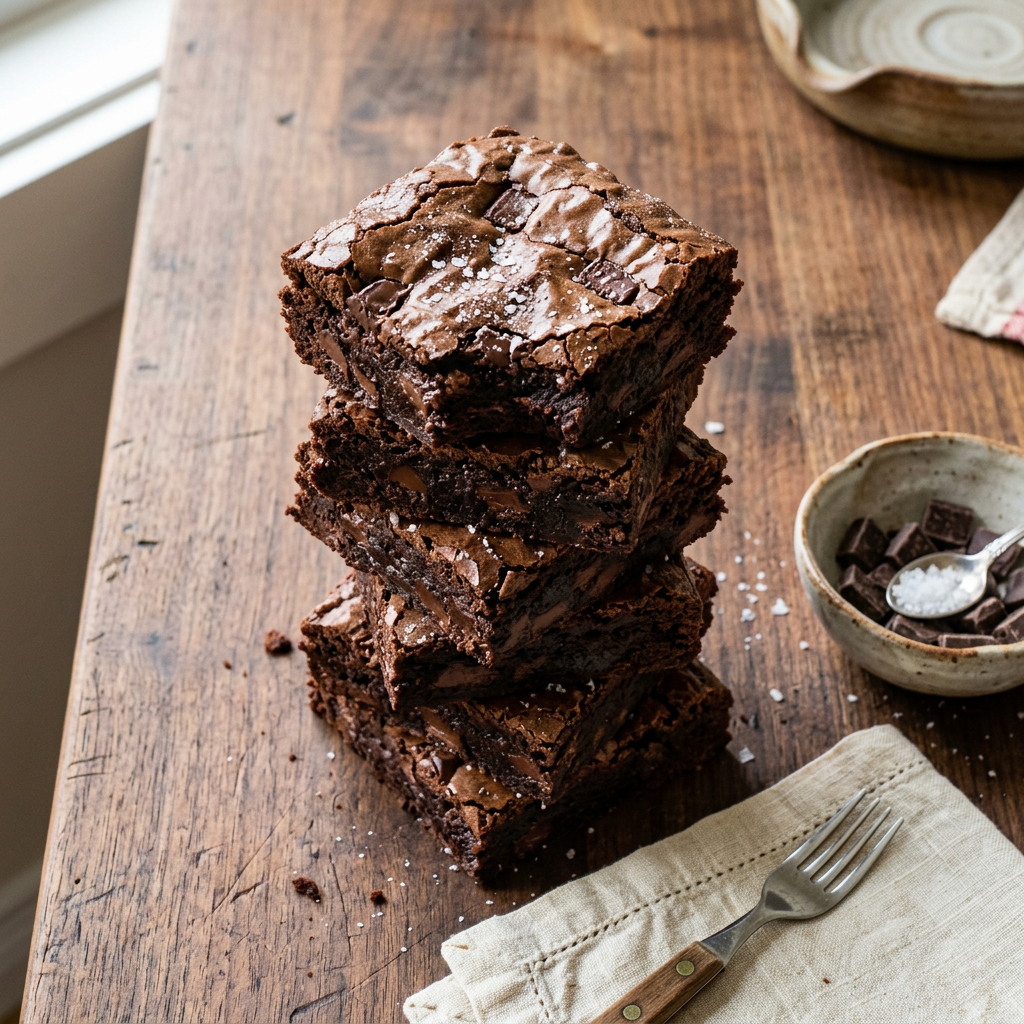
The Toothpick Smear Test: When to Pull Them
The standard toothpick test — insert and look for it to come out clean — does not work for fudgy brownies. A toothpick coming out clean means they are overbaked. A toothpick coming out with liquid batter means they are underbaked. What you want is a toothpick that comes out with moist, fudge-like crumbs smeared on it — not raw batter, not clean, but visibly coated with cooked but sticky brownie material.
Begin checking at 25 minutes. Test with a toothpick inserted into the centre — the centre is always the last to set. At 28 minutes most 8×8 inch pans will show the smear. At 30 minutes the smear gets smaller and drier. At 32 minutes the toothpick comes out mostly clean and the brownies are at the cakey end of the range. Pull at the smear stage for maximum fudginess.
The ThermoPro Candy Thermometer is useful for verifying oven temperature at 350°F — home ovens running hot produce brownies that brown on the outside while the centre remains underdone, while ovens running cool produce brownies that never quite set. Clipping the probe to the oven rack tells you your actual temperature before the pan goes in.
The Rest: Why You Cannot Cut Them Immediately
Brownies cut directly from the oven collapse — the interior is still liquid and has not had time to set into the dense, sliceable texture that makes a proper brownie. Allow them to cool completely in the pan before cutting. This takes a minimum of one hour at room temperature, or thirty minutes in the fridge.
The rest period is also when fudgy brownies reach their best texture. Warm from the oven they are almost molten — delicious but not truly fudgy. After cooling they firm up into the dense, slightly resistant, deeply satisfying texture that is the point of making them this way. The exterior edges set into the chewy, slightly firm border that many people consider the best part.
Cut with a sharp knife, wiped clean between cuts. A dirty knife drags crumbs through the clean chocolate surface of each square and produces ragged edges. A clean knife through fully cooled brownies produces the clean, glossy, slightly shiny cut surface that looks exactly right.
The Espresso Powder Secret
A quarter teaspoon of instant espresso powder or instant coffee dissolved into the melted chocolate-butter mixture is the most consistently effective enhancement to a brownie recipe that most beginners have not tried. Espresso does not make brownies taste of coffee — it amplifies chocolate flavour in the same way salt amplifies savoury dishes, by enhancing the existing flavour rather than adding a new one. Side-by-side, brownies made with and without espresso powder produce an immediately noticeable difference in how intensely chocolatey the finished result tastes.
Variations
Walnut brownies: fold in 80g (3/4 cup) of roughly chopped walnuts at the same time as the chocolate chips. The slight bitterness and crunch of the walnut against the sweet, dense chocolate is one of the most classic brownie combinations.
Salted caramel brownies: drizzle two tablespoons of good-quality caramel sauce over the batter before baking and swirl with a knife. Sprinkle flaked sea salt over the top immediately before the pan goes into the oven. The salt and caramel against the dark chocolate interior is outstanding.
Peanut butter swirl: drop tablespoons of smooth peanut butter over the batter and swirl with a knife before baking. The fat from the peanut butter produces slightly lighter pockets within the dense chocolate base — a visual and flavour contrast that makes an already good brownie considerably more interesting.
For anyone wanting to build further baking skills from the foundation this recipe provides — understanding how fat, flour, and egg ratios control texture applies across every baked good — the Complete Beginner’s Guide to Mastering Breads, Cakes, Cookies and Pastries covers the full range of baking techniques with the same ratio-based logic. The same chocolate knowledge that makes these brownies work also directly informs the chocolate chip cookies guide — both recipes are built on understanding how chocolate and butter behave under heat.
Fudgy Homemade Brownies
One bowl, dual chocolate method — melted dark chocolate plus cocoa powder — with butter, eggs, minimal flour, and espresso powder for maximum depth. Dense, fudgy, crinkly-topped. The toothpick smear test tells you when to pull them. Better than any box mix and almost as fast.
Ingredients
- 115g (1/2 cup / 1 stick) unsalted butter, cut into pieces
- 170g (6 oz) good quality dark chocolate (60–70% cacao), roughly chopped
- 200g (1 cup) granulated white sugar
- 50g (1/4 cup packed) brown sugar
- 2 large eggs + 1 egg yolk, room temperature
- 1 tsp vanilla extract
- 1/4 tsp instant espresso powder (optional but strongly recommended)
- 65g (1/2 cup) all-purpose flour
- 30g (1/4 cup + 1 tbsp) Dutch-process cocoa powder
- 1/2 tsp salt
- 100g (1/2 cup) dark chocolate chips or roughly chopped chocolate (optional, for extra richness)
Instructions
- Preheat oven to 350°F (175°C). Line an 8×8 inch baking pan with parchment paper, leaving overhang on two sides for easy removal.
- Melt butter and chopped chocolate together in a small saucepan over the lowest possible heat, stirring constantly, until completely smooth. Remove from heat. Stir in espresso powder if using. Set aside to cool for 4–5 minutes.
- In a large bowl, whisk the eggs, egg yolk, both sugars, and vanilla together vigorously for 2–3 minutes until pale, slightly thickened, and the mixture falls from the whisk in a thick ribbon.
- Pour the cooled chocolate mixture into the egg-sugar mixture. Stir gently until just combined.
- Sift in flour, cocoa powder, and salt. Fold with a rubber spatula using slow strokes from the bottom up — 15 to 20 strokes until no dry flour remains. Do not overmix. Fold in chocolate chips if using with 2–3 additional strokes.
- Pour batter into the prepared pan and spread to the edges. Tap the pan gently on the counter twice to level.
- Bake for 28–32 minutes. Begin checking at 25 minutes. Insert a toothpick into the centre — pull the brownies when the toothpick comes out with moist, fudge-like crumbs smeared on it (not raw batter, not clean). This is the fudgy sweet spot.
- Cool completely in the pan — minimum 1 hour at room temperature. Do not cut while warm. Lift out using the parchment overhang. Cut with a sharp knife wiped clean between cuts. 16 squares from a single cut pattern (4 x 4).
Notes
Storage: Room temperature in an airtight container for up to 5 days — they improve on day two as the chocolate flavour deepens. Freeze for up to 3 months; thaw at room temperature for 1 hour.
Cakey vs. fudgy: For cakier brownies, add an extra 30g (1/4 cup) flour and use 2 whole eggs with no extra yolk. Bake 2–3 minutes longer and pull when the toothpick is nearly clean.
Chocolate quality: Use the best dark chocolate bar you can reasonably afford. This is the single biggest flavour variable in the whole recipe. Good chocolate costs slightly more and produces dramatically better-tasting brownies.
Dutch-process cocoa: Produces a smoother, deeper chocolate colour and a less acidic flavour than natural cocoa. Worth seeking out but natural cocoa works if that is what you have.
Beginner tip: The toothpick smear is the one technique to learn and remember. A clean toothpick means overbaked and dry. Raw batter means underbaked. Smeared fudge-like crumbs is exactly right. Check at 25 minutes and every 2 minutes after until you see the smear.
Tools & Resources
- Complete Beginner’s Guide to Mastering Breads, Cakes, Cookies and Pastries — the fat-to-flour ratio logic that makes these brownies fudgy applies across every baked good in this comprehensive beginner baking guide
- ThermoPro Candy Thermometer — verify actual oven temperature at 350°F before baking; a hot oven produces brownies that firm on the outside while the centre is still raw, while a cool oven never fully sets them
- Taima Titanium Nutri Pan Pro 2.0 — even-heating, PFAS-free pan for melting butter and chocolate together over the very low heat that prevents scorching without constant temperature anxiety
- Taima Titanium Deep Pan Pro — oven-safe, PFAS-free alternative to a standard baking pan for a thicker batch of brownies with a slightly different crust-to-interior ratio
A great brownie recipe requires three decisions made correctly. First, use both melted dark chocolate and cocoa powder — one brings richness and complexity, the other brings intensity and depth, and together they produce a flavour that neither achieves alone. Second, whisk the eggs and sugar properly before the chocolate goes in — this builds the crinkly top and provides structure without adding flour. Third, pull the brownies at the toothpick smear stage rather than waiting for a clean result — that smear is the fudgy interior in its set but still moist state, and every minute beyond it is a minute of moisture lost to the oven. Cool completely before cutting. The result is a brownie that improves over two days, stays genuinely moist for five, and freezes perfectly for whenever the craving arrives.
The pan you melt the chocolate in determines whether that step is stressful or simple — even heat at very low temperature is the only requirement, and a non-reactive, PFAS-free surface that does not add any off-flavour to a recipe this chocolate-forward matters more than it would in a spiced or heavily seasoned dish. If you are thinking about upgrading your baking and cooking equipment, the full breakdown is at Titanium Cookware That Actually Works (2025) — covering what sets pure titanium apart and which pieces to prioritize first.
Leave a Reply